Getting Started with YaleSites

This resource will guide you in how to navigate, create content, and perform all the basic site-building activities offered by the new YaleSites platform. Whether you’re a novice or an experienced user, this guide is here to support you every step of the way. From understanding the user interface to customizing your site’s design, you’ll find detailed instructions, helpful tips, and best practices to help you build your site confidently and easily. 

Administrative Tools

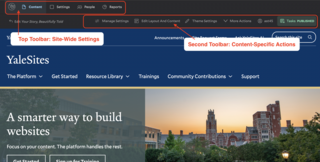
YaleSite’s Drupal environment provides a set of authoring tools that are designed to make the website creation process as easy as possible. The first thing you will see, after adding “/cas” to your URL and logging in with your NetID, are two toolbars at the top of your page. 

YaleSites administrative toolsbars

YaleSites Platform administrative toolbars.

Top Toolbar (Site-wide)

The top toolbar contains all of your site-wide-specific settings. These settings are categorized as Content, Settings, People, and Reports. You can also click the Yale icon to return to your assigned homepage. 

YaleSite Toolbar "Content"

“Content” section in the top administrative toolbar.

Content

The content section of the top admin toolbar contains all of the primary actions related to creating and managing content on your YaleSite. Here, you can:

  • Add new content types
  • Manage all your existing content types
  • Manage your media library
  • Manage your main menu and your utility menu
  • Manage your YaleSites taxonomy

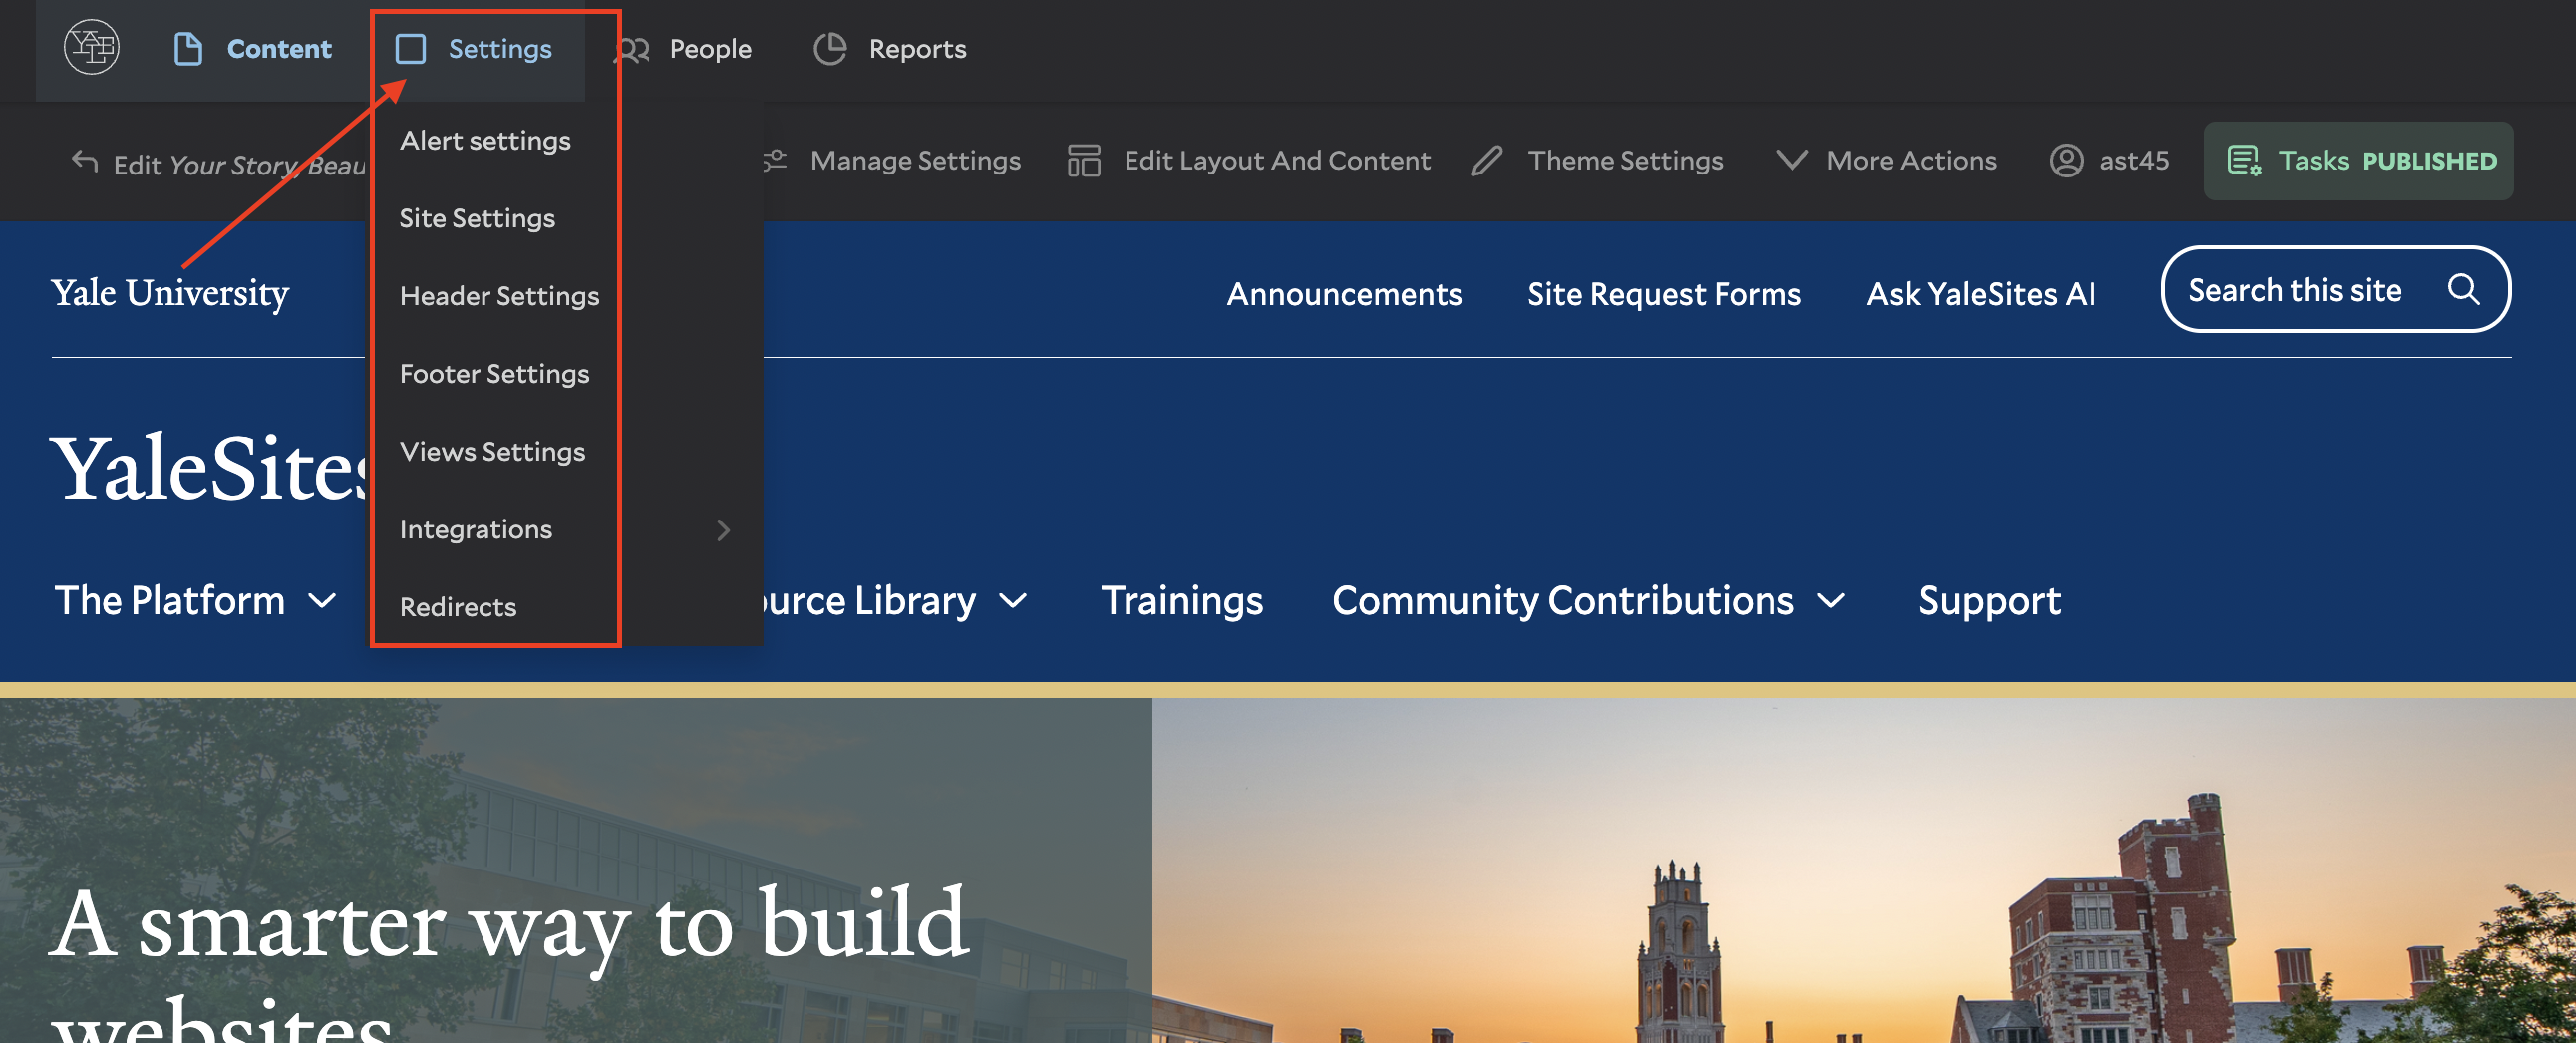
Settings

In settings, you will find all of the setting configurations that you can customize on your YaleSite. 

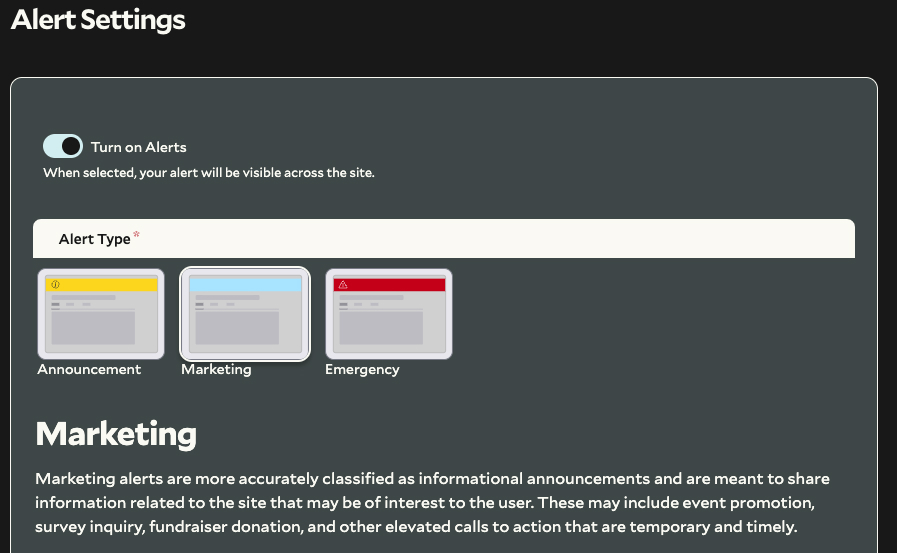
YaleSites alert settings

YaleSites site-wide alert settings.

Alert settings allow you to create site-wide alerts for your site, including alert types such as Announcement, Marketing, or Emergency. You can only have one active alert at a time, so make sure it is relevant and important to your users. 

Site Settings contain many specific and customized settings that you may want to look at, including assigning your homepage, Google Analytics verification, and a fallback teaser image for your content, to name a few. 

Footer settings allow you to choose between the Basic footer or the Mega footer. The Basic footer contains general Yale branding and social media links. The Mega footer provides advanced features for representing organizational branding, including:

  • Additional icons 
  • A space for an organizational wordmark 
  • A customizable text area for information such as contact information and physical addresses 
  • Up to 8 links in a two-column format 

The redirect page enables you to view and manage all the redirects on your YaleSite. You can edit the details of each redirect, such as the starting URL, the new redirect extension, the status code, and the ability to delete any unnecessary redirects. 

People

The people section allows you to add new users to your YaleSite which gives them the ability to edit and create content. If your user is Yale affiliated, select Add CAS user(s) and add their NetID in the “CAS Username(s)” input field.   

YaleSites people settings

People section in top administrative toolbar.

2nd Toolbar (Page-specific) 

The second toolbar is located directly below the top toolbar and contains actions that are specific to a page or node. If you are not on a page, such as an admin page or an empty node, you may not see any actions on this toolbar. To view all the available options, navigate to a page. You can click on the Yale icon to go directly to your assigned homepage, if necessary. 

Manage Settings 

The Manage Setting page offers logistical settings based on your content type. These settings can be customized to suit your specific needs. All content types include Teaser information. This allows you to assign content that will be used when featuring that content on social media, search engines, and on your YaleSite. Utilize blocks like Views, Post feed, Calendar List, and Profile Directories to see your content’s teaser information in action. 

In addition, you may tag your node with a taxonomy term that belongs to the Tag vocabulary. You can find your taxonomy vocabularies under the top admin bar in Content > Manage Taxonomy. Other content types like Events, Posts, and Profiles have an additional taxonomy vocabulary that is specific to that content type (for example; Post Category, Profile Affiliation, etc.) 

Yalesites manage settings side bar

Manage settings sidebar settings.

The Manage settings menu on the right-hand side includes various settings such as: 

  • Adding a page to one of your menus 
  • Editing your metadata 
  • Excluding your page from being indexed by search engines 
  • Adding a redirect to the page 
  • Requiring a CAS login to access the page 
  • Creating a URL alias 

Edit Layout and Content 

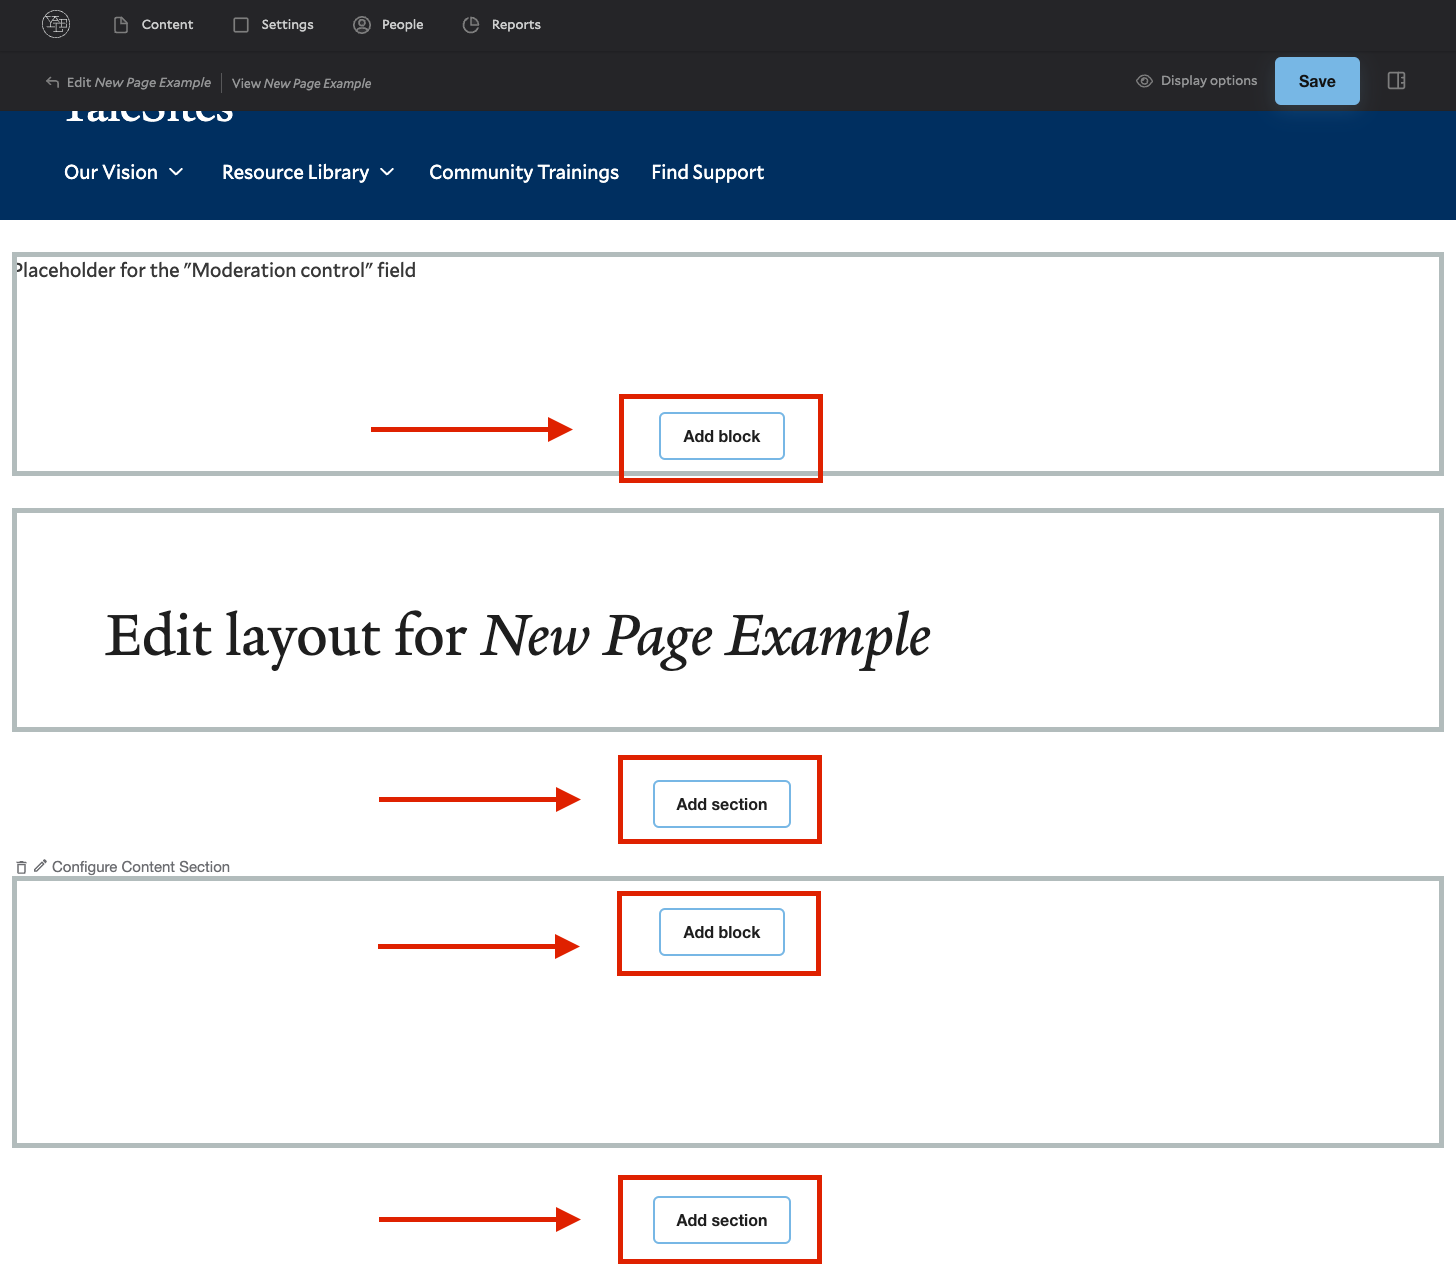
Enable Layout Builder by clicking Edit Layout and Content on the secondary toolbar. This is the primary way to create and manage content on your page. There are two main content areas on a page. The first is the area below the site name but above the page title, which is for Banner content. The other area is below the page title, where the rest of your content will be located. 

To add content, click the “Add Block” button on your page. YaleSites offers pre-built, fully accessible, and responsive web components. To edit existing blocks, click the circle pencil icon on the left of the block, and then click Configure. 

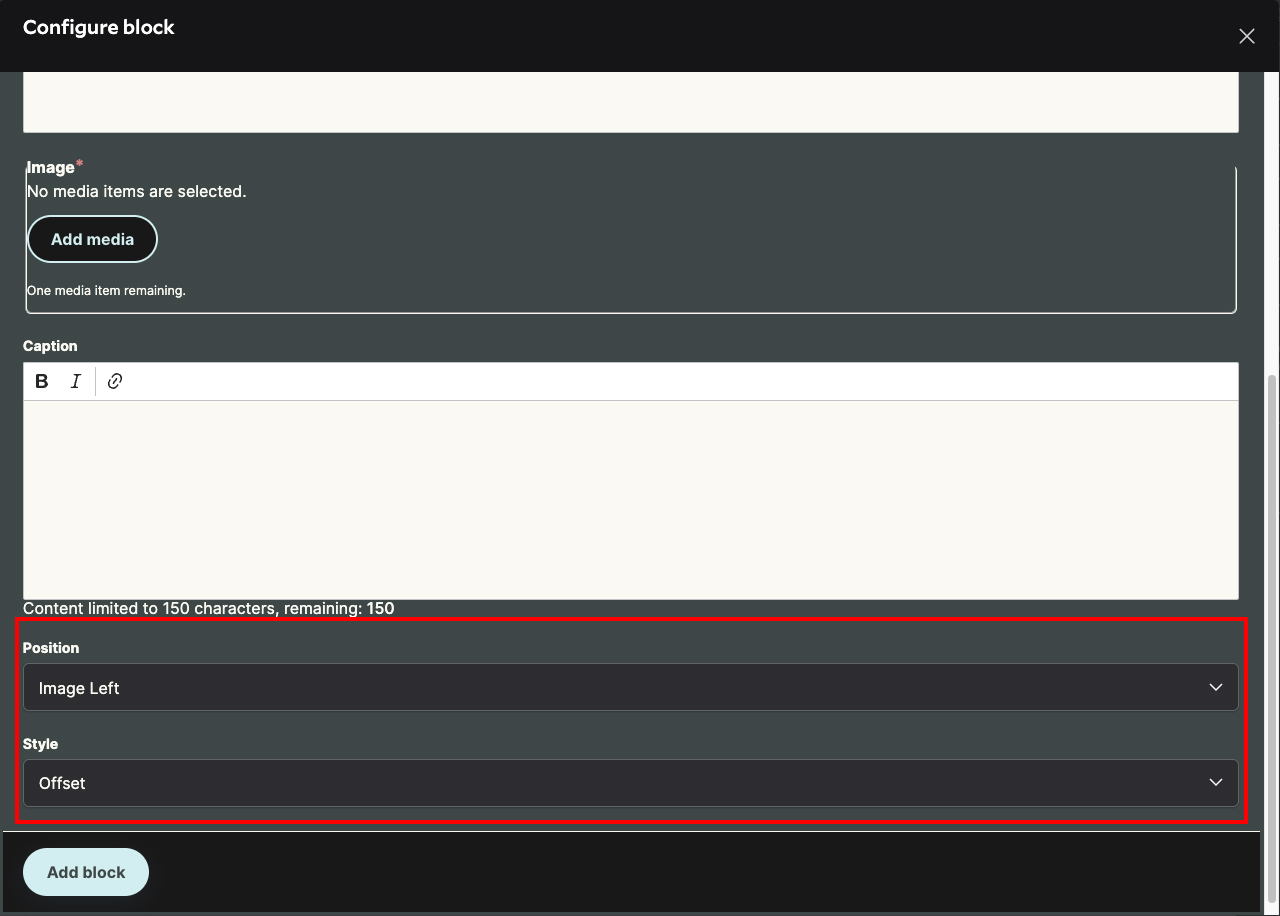
a yalesite component with a highlighted design option

Wrapped Image block design options.

Creating a block requires several text inputs and specific settings based on the block’s content requirements. Certain input fields are mandatory depending on the visual and content demands. Additionally, input fields may have recommended or hard maximum character limits. Furthermore, blocks can have design options that allow you to modify their visuals. For example, the wrapped text block provides design options for image position (left and right) and image style (inline and offset). Our resource, Building With Blocks, goes into more detail on how you can build your site utilizing our blocks to their fullest potential.  

On Page and Profile content types, you can create sections and add one or two column layouts. In a two-column layout, you can add text or profile contact (if on a profile content type) information in the right-side column and select blocks in the main content area. 

YaleSites administrative preview content option

Toggle between content and administrative labels via Preview Content

While using the Layout Builder, you can rearrange blocks on your YaleSite by clicking and dragging them. To view your page’s content in a more condensed manner, go to the second admin toolbar and, under Display Options, toggle Preview Content. This will enable you to see only the administrative labels of your blocks and drag and drop them in a more condensed view with less scrolling on your page. 
Building With Blocks

This resource will help you understand the Blocks available and how to use them to make your content shine.

View This Resource

Editorially 

Editoria11y flags potential accessibility (a11y) issues for manual review. This a11y tool is located in a small circle on the bottom right-hand corner of your page. Although YaleSites blocks are built to be accessible, content can still cause accessibility issues. That’s where Editorially comes in to help. 

  • If Editoria11y detects no a11y issues on your page, you will see a checkmark.  
  • If Editoria11y detects potential a11y issues, it will flag errors and offer short prompts that explain the detected issue and offer possible solutions.  

While Editoria11y is a useful resource, it is just one tool and is not intended to fully replace web accessibility audits. For more information about Editoria11y, see our announcement post.

Add a page to a navigation menu on your site in the Edit Page window. You will find Menu Setting on the right side of this window. Toggle the “Provide a menu link” button to add the page to your site navigation, and choose where the page will appear by designating the “Parent link” (i.e. <Main navigation>).   

Easily configure the main navigation of your website from the Top Toolbar (Site-wide Settings) by selecting Content > Manage Main Menu. Here you can configure your main menu by dragging and dropping pages.   

Navigation Types: Basic vs. Mega: You may choose to style your main site navigation in one of two ways. Select your preference under Theme Settings > Navigation Type.  

  • The Basic Menu style lists all child pages immediately underneath their parent menu item. This option is good for sites that contain fewer than five child pages per menu item.  
  • The Mega Menu style presents child pages in columns under the parent menu item. This menu also supports up to three levels of pages. Additionally, a landing page is available for each top section of your mega menu. 

Building Your Menu

Help you understand how the YaleSites menus work and ensure your users can easily navigate your YaleSite.

View This Resource

Customizing Theme

The YaleSites platform offers pre-built, Yale-approved color pairings that allow you to customize your site’s visual identity. To begin customization, go to the second toolbar and click on “Theme Settings.”. As you make changes in “Theme Settings,”, you will see a live preview of your site based on your decisions. Once you have customized it to your liking, click “Save” to apply the new visual identity to your YaleSite. 

Here are your customization options: 

  • Choose the overall color palette for your site. Each element on your YaleSite can have an assigned color “slot” on the color palette. 
  • Change the position of your main navigation on your YaleSite main header with the Navigation position setting. 
  • Switch between basic and mega navigation with the Navigation type setting. See more information about this choice.
  • Use the Button, Header, and Footer theme settings to target those content areas with different color choices. These options change based on your overall color palette choice. 

YaleSite Term Glossary

The YaleSites Term Glossary is a resource that provides explanations of key terminology and concepts associated with the YaleSites platform. Whether you’re a novice or an experienced user, this glossary is your go-to reference for navigating the YaleSites platform with ease.

Term

Definition

Administrative Label  Administrative labels are used to name all blocks added to your webpage. It is important to choose labels that make sense to you. For example, if you have a text block with introductory content, you could label it as “Intro Text”. To reorganize your content in a condensed view, toggle the “Preview Content” option under “Display Options”. This will display only the administrative labels, enabling you to drag-and-drop your content as desired. 

Design Option 

The Yale Design System includes blocks with alternate appearances, called Design Options. These options change the visual design of the block while still using the same content. For example, the Content Spotlight block has three design options: image position (left and right), content focus (equal, image, content), and image size (medium and large). 
Teaser Teaser information can be assigned to nodes in Manage Settings. This includes a teaser header, content, and image. When the webpage is shared on social media, found on search engines, or displayed via View blocks, this content will be shown. To ensure that every page has an image, you can assign a backup teaser image in Site Settings. 
Taxonomy  Taxonomy is a system used to classify website content, particularly for categorizing different content types. For instance, a post might use tags to classify blog posts. The individual categories assigned to content in this system are known as terms. A collection of terms is known as a vocabulary, which refers to all the categories used on a website. 
Taxonomy - Vocabulary  Vocabulary refers to a set of terms used to classify website content, often in conjunction with taxonomy to organize it. For example, a vocabulary can be used for classifying event categories. Default terms like Arts & Humanities are included in this vocabulary, but it can also be fully edited to meet your organizational needs. There is a vocabulary for each content type, as well as an overall “Tags” vocabulary that can span all content types. 
Views  Views enable you to dynamically represent your content on your YaleSite. In the Views block, you can select which content type you want to display, choose a visual format (cards, lists, condensed), and drill down to specific taxonomy terms. Once you add a new piece of content that matches all of your criteria, it will dynamically appear in your Views block. 
Pre-built Views  For each content type, there is a pre-built View block that is ready for use with a single click and does not require customization. For example, the Calendar block will dynamically display all upcoming Event content types in a list view. This can be great for landing pages for that specific content type. Pre-built views also come with an accompanying filter for the specific Taxonomy Vocabulary of the content types. 
Layout Builder  Layout Builder is the technology we use to build your content while providing a user-friendly experience. To access Layout Builder, click “Edit Layout and Content” in your second toolbar. You can drag and drop blocks to rearrange your content while getting a real-time representation of what your users will see when visiting your site. 

Community Trainings

Hands-on training is available for anyone who has requested a YaleSite or is responsible for building a YaleSite.

Upcoming Trainings